Outline for Baked Yogurt Bars
When it comes to easy, healthy snacks that can fit seamlessly into your busy lifestyle, baked yogurt bars are a transformative choice. Perfect for breakfast on the go, an afternoon pick-me-up, or a late-night treat, these bars bring together the best of both worlds: nutrition and flavor. So, grab your apron, and let’s jump into this delightful culinary adventure.
Ingredients You’ll Need for Baked Yogurt Bars
To create your baked yogurt bars, start by gathering the necessary ingredients. It’s amazing how simple elements come together to create something truly satisfying. Here’s what you’ll need:
-
Base Ingredients
-
2 cups of rolled oats
-
1 cup of yogurt (Greek yogurt works best)
-
1 ripe banana, mashed
-
¼ cup of honey or maple syrup for sweetness
-
Flavor Add-Ins
-
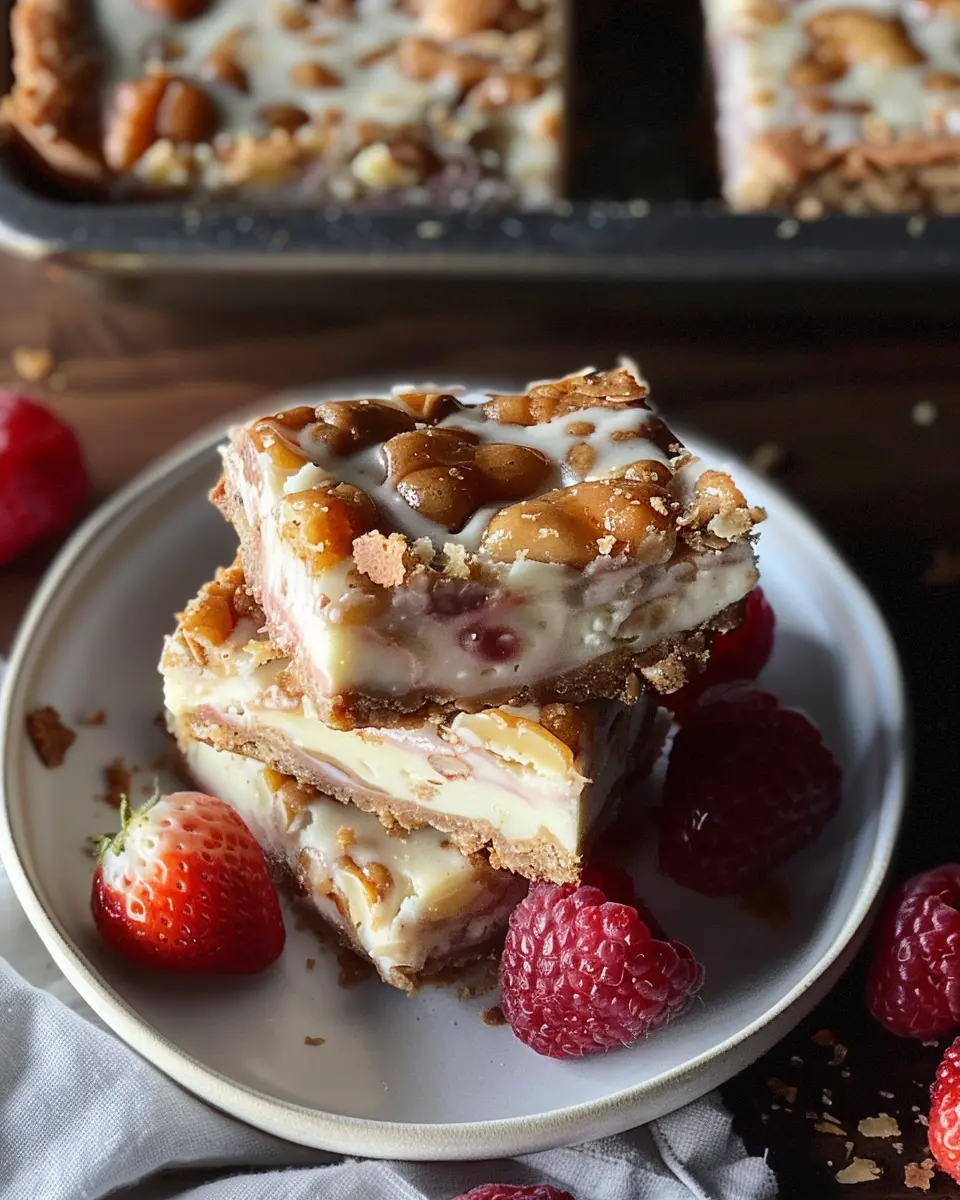
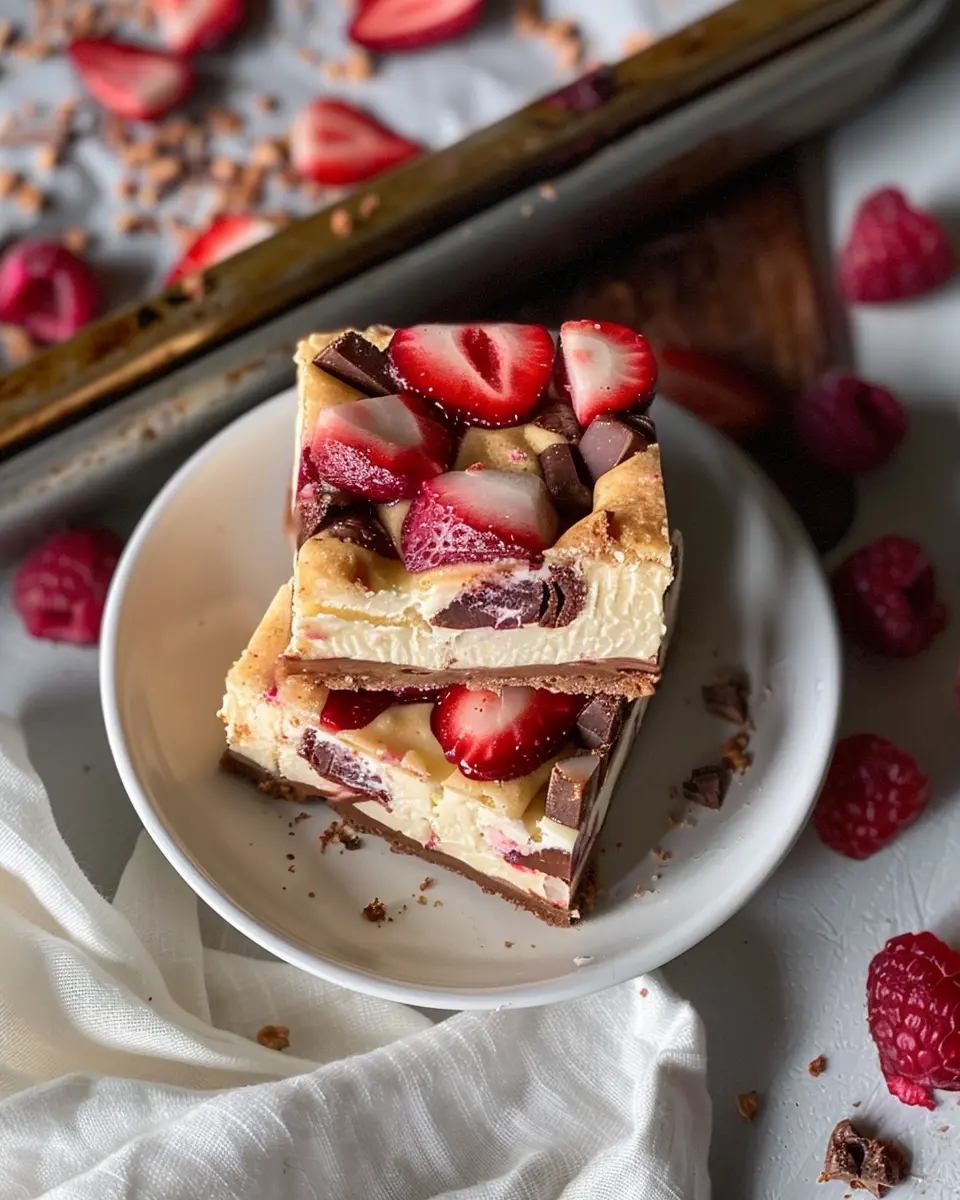
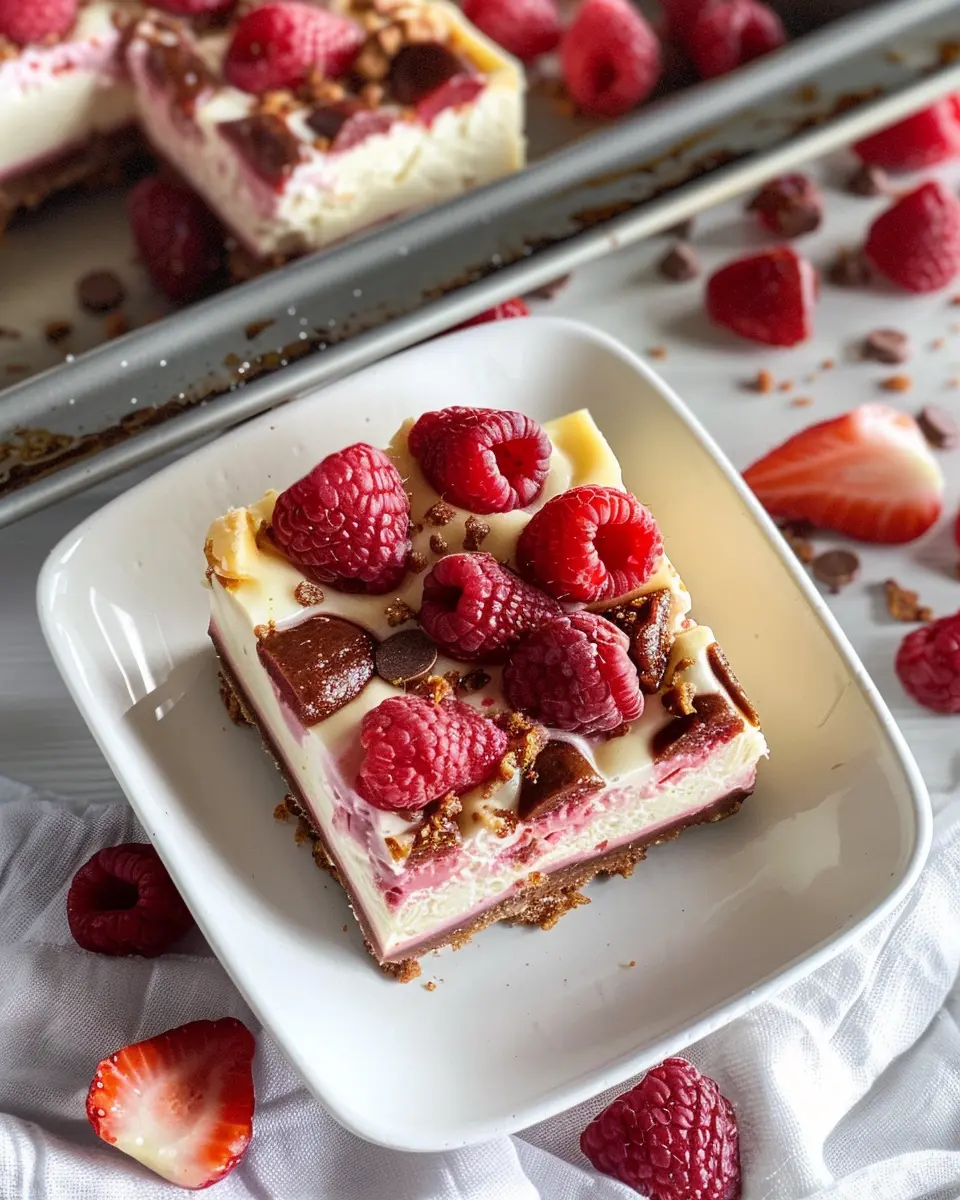
½ cup of mixed berries or dried fruit (like cranberries or cherries)
-
1/2 teaspoon of vanilla extract
-
1 teaspoon of baking powder
-
A pinch of cinnamon for warmth
-
Optional Ingredients
-
1/2 cup of Turkey Bacon, cooked and crumbled for extra protein
-
1/4 cup of nuts or seeds for crunch
-
A sprinkle of chocolate chips or shredded coconut for dessert-style bars
Selecting Quality Ingredients
Choosing high-quality ingredients can make a significant difference. When selecting your yogurt, opt for brands that use live cultures, as they add probiotics beneficial for gut health. Using organic oats and fresh fruits ensures you get the most nutrients. For a deeper dive into choosing healthy dairy, consider this guide on yogurt benefits. It’s a goldmine of information for anyone looking to improve their diet.
Step-by-Step Instructions to Prepare Baked Yogurt Bars
Now that you have your ingredients ready, it’s time to break down the process of making these delicious baked yogurt bars.
- Preheat Your Oven
- Set your oven to 350°F (175°C). Preheating is crucial for even cooking and to achieve that perfect chewy texture.
- Mixing the Base
- In a large mixing bowl, combine the rolled oats, baking powder, and cinnamon. Set this dry mix aside while you prepare the wet ingredients.
- In another bowl, whisk together the yogurt, mashed banana, honey, and vanilla extract until smooth. Combining wet and dry ingredients separately helps to evenly distribute the yeast.
- Combine and Add Flavors
- Gradually fold the wet mixture into the dry ingredients. Avoid overmixing; a few lumps are perfectly fine! Afterward, gently stir in your chosen add-ins like mixed berries, Turkey Bacon, or nuts.
- Bake to Perfection
- Lightly grease a baking dish or line it with parchment paper for easy removal. Pour the mixture into the dish and spread evenly.
- Bake for 25-30 minutes or until the edges are golden brown and a toothpick inserted in the center comes out clean. The aroma will fill your kitchen, promising deliciousness ahead!
- Cooling and Cutting
- Allow the bars to cool in the pan for about 10 minutes before transferring them to a wire rack to cool completely. Once cool, slice them into bars or squares for easy snacking.
Storage Tips for Your Baked Yogurt Bars
After all your hard work, you’ll want to ensure your baked yogurt bars stay fresh for as long as possible. Here are some storage tips:
-
In the Pantry
-
If you plan to consume the bars within a few days, store them in an airtight container at room temperature. They should remain deliciously moist for up to three days.
-
In the Refrigerator
-
For longer storage, keep the bars in the refrigerator. They can last up to a week. Just be sure to let them come to room temperature or warm them slightly in the microwave before enjoying to retain their chewiness.
-
Freezing for Later
-
If you’ve made a batch and need them to last even longer, freeze them individually wrapped in plastic wrap and then placed in a freezer-safe container. Thaw overnight in the fridge or pop them in the microwave for a quick snack.
Utilizing the freezer could mean having a healthy treat ready for those late nights when you’re craving something sweet, making it a great trick for busy professionals.
Creative Variations on Baked Yogurt Bars
While the basic recipe is fantastic, don’t be afraid to experiment with flavors! Here are a few ideas to inspire your culinary creativity:
-
Tropical Delight
-
Swap out mixed berries for mango and pineapple. Add a pinch of coconut flakes for a sunny, tropical vibe.
-
Chocolate Lovers
-
Mix in cocoa powder and dark chocolate chips for a chocolaty twist. You can top them with a light dusting of powdered sugar.
-
Nutty Banana
-
Add chopped walnuts or almond slices for extra crunch, alongside the banana. Nut butters can also give a rich flavor profile if swirled into the mixture.
Trying different flavors not only brings diversity to your snacks but could also help you discover a new favorite!
Serving Suggestions for Baked Yogurt Bars
Wondering how to enjoy your homemade baked yogurt bars? Here are some serving ideas to make your snack time even more enjoyable:
-
Pair with Fresh Fruit
-
Serve the bars with a side of fresh fruit like apple slices or a small bowl of mixed berries to enhance the nutritional value.
-
Top with Nut Butter
-
A drizzle of almond or peanut butter on top can add protein and fat, balancing your snack perfectly.
-
With a Cup of Tea or Coffee
-
Enjoy your bars alongside a warm cup of herbal tea or a strong cup of coffee. This duo can elevate your snack break into a relaxing ritual.
Nutritional Benefits of Baked Yogurt Bars
When made with wholesome ingredients, baked yogurt bars can be a great source of energy and nutrients. Here’s a brief overview of their health benefits:
-
Protein-Rich
-
Incorporating yogurt provides a good amount of protein, essential for muscle repair and overall wellness.
-
Fiber Boost
-
Rolled oats are a fantastic source of dietary fiber, aiding in digestion and helping you feel fuller longer.
-
Vitamins and Minerals
-
With the addition of fruits and nuts, you enhance the vitamin and mineral content, contributing to a well-rounded diet.
For those curious to learn more about the nutritional impact of oats and yogurt on health, check out the information from Healthline to dive deeper into the benefits.
Conclusion: Why Baked Yogurt Bars are a Must-Try
Embracing easy, nutritious snacks like baked yogurt bars can dramatically elevate your daily routine. They’re quick to prepare, customizable to your taste preferences, and provide a balance of macronutrients perfect for fueling your busy lifestyle.
So why not take the plunge? Add these bars to your meal prep for the week and find out just how delightful healthy snacking can be. With every bite, you’ll be fueling your body with goodness while treating yourself to something delicious. The best part? You can feel good about what you’re eating, which is always a win in our books. Happy baking!
Introduction to Baked Yogurt Bars
Why Baked Yogurt Bars Are the Perfect Homemade Snack
If you’re on the lookout for a delicious and nutritious snack, look no further than baked yogurt bars. These treats are not only easy to make but also incredibly versatile. Packed with protein from yogurt and sweetened naturally, they provide a satisfying energy boost without the guilt.
Here are some reasons you’ll love these bars:
- Healthy Ingredients: Using plain yogurt, oats, and fruits means you control what goes into your snack. No more dodging hidden sugars or preservatives found in store-bought options.
- Quick and Easy: With just a few minutes of prep time and simple ingredients, these baked yogurt bars can be whipped up in no time—perfect for those busy weekdays.
- Customizable: You can modify the recipe to fit your taste. Whether you prefer a berry blend, chunks of chocolate, or nutty goodness, the possibilities are endless!
- Portion-Controlled: Each bar offers a great way to manage portion sizes, making them ideal for kids and adults alike.
How I Stumbled Upon This Recipe
My love for baked yogurt bars began when I was searching for a healthier alternative to my afternoon snacks. One particularly hectic week, I needed something quick to grab before heading to work. After a bit of online searching, I stumbled upon a scrumptious recipe that immediately piqued my interest.
I loved how easy the steps were and that I had most of the ingredients at home already. Inspired, I decided to give it a shot. The results were fantastic—golden, chewy bars that disappeared faster than I expected! It’s incredible how a simple recipe can bring so much joy.
Ever since then, I’ve been experimenting with variations, adding spices like cinnamon and trying different fruits. I learned about whole grains from resources like the Whole Grains Council, which gives insight into the benefits of whole grains in home-baked items. They’re not just good for health; they also add fantastic flavor!
Baked yogurt bars have become a staple in my kitchen, and I’m excited to share this recipe so you can enjoy the same delicious experience. Get ready to bring a bit of homemade goodness into your snack routine!
Ingredients for Baked Yogurt Bars
Essential ingredients you’ll need
Creating baked yogurt bars is a delightful mix of simplicity and health. To whip up a batch, here’s what you’ll need in your kitchen:
- Yogurt: Choose plain Greek yogurt for its creamy texture and protein-packed goodness.
- Oats: Rolled oats work best as they provide structure and a lovely chewy texture.
- Honey or Maple Syrup: A natural sweetener that adds flavor and moisture.
- Eggs: These act as a binding agent, ensuring your bars hold together perfectly.
- Baking Powder: This will give your bars that light, fluffy texture we all love.
- Salt: Just a pinch enhances the flavors beautifully.
Optional add-ins for customization
Want to make your baked yogurt bars uniquely yours? Here are some fantastic optional add-ins:
- Nuts or Seeds: Almonds, walnuts, or chia seeds add a delightful crunch.
- Fruits: Fresh berries or bananas can infuse your bars with natural sweetness and vibrant flavors.
- Chocolate Chips: Who doesn’t love a touch of chocolate? They can elevate your bars to a new level of deliciousness.
Consider trying different combinations of these ingredients to discover your favorite flavor profiles. If you’re looking for inspiration, check out resources like Eat This, Not That for more ideas on incorporating healthy ingredients into your snacks.
Get creative, and enjoy the bake!
Step-by-Step Preparation of Baked Yogurt Bars
Creating delicious baked yogurt bars is a simple yet rewarding process that can kickstart your day or serve as a healthy snack. Let’s dive into the steps that will guide you through the preparation of these delightful bars, ensuring they turn out perfectly every time.
Gather and measure your ingredients
The first step in preparing your baked yogurt bars is gathering all your ingredients. It’s important to measure everything in advance, so you’ll have a smooth cooking experience. Here’s a quick list of what you’ll need:
- Greek yogurt (2 cups): This is the star of your recipe, offering a protein boost and creamy texture.
- Honey or maple syrup (1/3 cup): For natural sweetness.
- Eggs (2 large): These will help bind the mixture together.
- Oats (1 cup): Use rolled oats for a pleasant chew.
- Vanilla extract (1 teaspoon): Adds a nice flavor.
- Baking powder (1 teaspoon): This will give your bars a little rise.
- Optional mix-ins: Chopped turkey bacon, dried fruit, or nuts as per your taste.
Take some time to familiarize yourself with these ingredients — doing so will set you up for success! If you’re interested in the health benefits of Greek yogurt, check out this article from Healthline.
Preheat your oven and prepare the baking dish
Now that your ingredients are ready, it’s time to preheat your oven to 350°F (175°C). Preheating ensures even cooking, which is vital for achieving that perfect texture. While that’s happening, grab an 8×8-inch baking dish and lightly grease it with some cooking spray or line it with parchment paper. This step will prevent your baked yogurt bars from sticking, making it easier to remove them later.
Mix ingredients in a bowl or blender
Next, it’s time to mix your ingredients! You can use either a large bowl and a whisk or a blender for this step, depending on your preference. Start by combining the Greek yogurt, honey (or maple syrup), and eggs. Mix until smooth. Then, add the oats, baking powder, and vanilla extract, stirring until everything is well incorporated.
If you’re opting to add any mix-ins like turkey bacon or nuts, fold them in gently at this stage. This not only enhances the flavor but also adds an interesting texture to your bars. Don’t forget to taste your mixture — it should be a nice blend of sweet and creamy!
Pour the mixture into the baking dish
Once your mixture is ready, pour it into the prepared baking dish. Spread it evenly using a spatula to ensure uniform baking. It’s also best to tap the dish gently on the countertop to eliminate any air bubbles. This little step will lead to a better texture in your finished bars.
Bake and monitor the cooking time
Place the baking dish in your preheated oven and set your timer for about 25–30 minutes. Keep an eye on it — you want your baked yogurt bars to be golden on top and firm to the touch. Every oven is different, so checking for doneness a few minutes early can help you avoid overbaking.
Cool and slice your yogurt bars
Once they’re done baking, remove the dish from the oven and let it cool at room temperature for about 10–15 minutes. Then, transfer the bars to the refrigerator for at least 30 minutes to fully set. This chilling process makes slicing much easier!
Using a sharp knife, cut your baked yogurt bars into squares or rectangles, depending on your serving preference. Store any extras in an airtight container in the fridge for a quick snack throughout the week.
Final Thoughts
And there you have it! Simple steps to creating scrumptious baked yogurt bars that are not just easy to prepare but also customizable to suit your taste. Why not experiment with flavors, or try various toppings? Enjoy your healthy creation, and don’t forget to share it with your friends!
Variations on Baked Yogurt Bars
When it comes to baked yogurt bars, the base recipe is just the beginning! There are a ton of delicious variations that can elevate your bars to new heights. Let’s explore a few enticing ideas.
Fruit and Nut Additions for Extra Flavor
Incorporating fruits and nuts is a fantastic way to add texture and flavor to your baked yogurt bars. Consider these options:
- Fruits: Fresh berries, chopped bananas, or diced apples can infuse natural sweetness. You might even try dried fruits like cranberries or apricots for a chewy bite!
- Nuts: Almonds, walnuts, or pecans bring a crunch that complements the creaminess of the yogurt. Plus, they’re packed with protein and healthy fats!
As a bonus, swapping in seasonal fruits can keep your bars exciting year-round!
Swapping Out Sweeteners for Healthier Options
If you’re watching your sugar intake, consider swapping out traditional sweeteners for healthier alternatives. Natural options like honey, maple syrup, or even mashed bananas provide sweetness while adding unique flavor notes. If you are curious about the benefits of various natural sweeteners, check out sources like Healthline.
Making It Dairy-Free with Alternative Yogurts
For those who prefer a dairy-free lifestyle, don’t fret—you can easily adapt your baked yogurt bars with alternative yogurts. Coconut or almond milk-based yogurts offer creamy textures without dairy. They also come in various flavors, allowing you to tailor your bars to your taste preference.
With these variations, your baked yogurt bars can be a canvas for your culinary creativity! What flavor combinations will you try next?

Cooking Tips and Notes for Perfect Baked Yogurt Bars
Avoiding Common Mistakes
When making baked yogurt bars, it’s easy to overlook small details that can impact your final product. Here are a few tips to keep in mind:
- Don’t overmix your batter. A gentle folding technique will keep your bars light and fluffy.
- Make sure your baking powder is fresh—expired ingredients can lead to flat bars. Check the label for a trusty date!
- Ensure even baking by spreading the batter evenly in the pan. Uneven layers can lead to undercooked centers.
Extra Tips for Achieving the Best Texture
The ideal texture for baked yogurt bars is creamy yet firm. To achieve this:
- Use full-fat yogurt for a richer flavor and creaminess. Lower fat options may not hold together as well.
- Allow the bars to cool completely before slicing. Cutting too soon can result in a crumbly mess.
- For an added twist, consider folding in some chopped nuts or chocolate chips before baking. This not only enhances texture but also adds flavor.
If you’d like to learn more about baking techniques, check out sources like King Arthur Baking for expert advice. Remember, the journey of baking is just as rewarding as the delicious end result!
Serving Suggestions for Baked Yogurt Bars
Enjoying them as breakfast or a snack
Baked yogurt bars are not just a treat for your taste buds; they also make for a nutritious breakfast option or a satisfying snack. With their creamy texture and wholesome ingredients, they can provide a great start to your day or a quick pick-me-up when you’re feeling a bit sluggish. Simply grab one on your way to work, or enjoy them with a cup of coffee for a perfect morning combo.
Creative ways to serve with toppings
Elevate your baked yogurt bars by adding a variety of toppings that fit your taste. Consider:
- Fresh fruits like berries or sliced bananas for a pop of color and flavor
- A drizzle of honey or maple syrup for added sweetness
- A sprinkle of nuts or seeds, such as chia or almonds, for a delightful crunch
Feel free to mix and match these toppings to create your own signature serving style! For inspiration, check out this article on enhancing simple snacks over at Healthline.
These little tweaks can transform your baked yogurt bars into an exquisite snack that’s not only tasty but also visually appealing. What toppings will you try first?
Time Breakdown for Baked Yogurt Bars
Preparation Time
Getting started is a breeze! The preparation time for these delicious baked yogurt bars is around 15 minutes. Just gather your ingredients, whip them up, and you’re halfway to a tasty treat!
Cooking Time
Once you’ve prepped everything, slip the mixture into the oven. The cooking time is approximately 30 minutes. You’ll have some delightful aromas filling your kitchen while you wait, making it all worthwhile!
Chilling Time
After baking, it’s important to be patient. The chilling time is about 2 hours. This is what makes your bars firm, so try not to sneak any bites during this phase!
Total Time
All said and done, the total time to enjoy your baked yogurt bars is roughly 2 hours and 45 minutes. Grab your favorite book or catch up on a show, and before you know it, you’ll be indulging in a nutritious, homemade treat! Want more recipes? Check out this great guide for additional tips and ideas.
Nutritional Facts for Baked Yogurt Bars
Calories and Macros Breakdown
These baked yogurt bars are a wholesome snack option, typically clocking in at around 150 calories per serving. For those mindful of their macros, expect approximately:
- Protein: 8g
- Carbohydrates: 20g
- Fat: 5g
This nutritional profile makes them an excellent choice for those seeking to balance energy levels while curbing hunger between meals.
Health Benefits of the Key Ingredients
The goodness of these baked yogurt bars lies in their simple yet nourishing ingredients:
- Greek Yogurt: A superb source of protein and probiotics, promoting digestive health (source).
- Oats: Rich in fiber, they aid in heart health and help maintain stable blood sugar levels (source).
- Honey: A natural sweetener loaded with antioxidants, beneficial for your skin and overall health.
By enjoying these bars, you’re not just satisfying your sweet tooth; you’re also fueling your body with vital nutrients!
FAQs about Baked Yogurt Bars
Can I freeze baked yogurt bars?
Absolutely, baked yogurt bars can be frozen for later enjoyment! Just make sure to let them cool completely before placing them in an airtight container or wrapping them tightly in plastic wrap. They can be stored in the freezer for up to three months. When you’re ready to enjoy a bar, simply thaw it in the fridge overnight or at room temperature for about an hour. This is a great way to meal prep for busy weeks ahead.
How long do they last in the fridge?
When stored properly in an airtight container, these delicious baked yogurt bars can last up to five days in the fridge. You’ll want to keep an eye on them, though; if they start to look questionable, it’s best to err on the side of caution. These bars make a perfect, quick snack during the week, so consider batch-making to keep them on hand!
Are there any substitutions for eggs in the recipe?
If you’re looking for egg alternatives, you’re in luck! You can replace one egg with:
- 1/4 cup unsweetened applesauce for added moisture and sweetness
- 1/4 cup mashed banana, which will impart a slight banana flavor
- 1 tablespoon of flaxseed meal mixed with 2.5 tablespoons of water. Let it sit until it becomes gelatinous
- A store-bought egg replacer according to package instructions
These substitutions will help keep your baked yogurt bars fluffy and delicious while catering to various dietary needs. Want to explore more about alternative baking ingredients? Check out this resource.
With these answers, you’re all set to enjoy your baked yogurt bars any way you like! If you have more questions or tips, feel free to reach out in the comments. Happy baking!
Conclusion on Baked Yogurt Bars
Recap of the benefits and joys of homemade snacks
Making homemade snacks like baked yogurt bars brings a unique joy that store-bought options simply can’t replicate. You have control over the ingredients, offering a wholesome treat that’s both nutritious and delicious. With a balance of protein and natural sweetness, these bars make for a fantastic energy boost during busy afternoons.
Encouragement to try the recipe at home
Why not take a moment to create your own versions? Experiment with flavors and textures to make them truly yours. You might discover that your favorite twist involves colorful fruits, nuts, or even some Turkey Bacon for that added crunch! Dive into this enjoyable culinary adventure, and relish the satisfaction of sharing these tasty bars with family or friends. You won’t regret it!
PrintBaked Yogurt Bars: Easy, Healthy Treats for Everyone
A delicious and healthy treat for everyone, these baked yogurt bars are easy to make and perfect for snacks or desserts.
- Prep Time: 10 minutes
- Cook Time: 30 minutes
- Total Time: 40 minutes
- Yield: 12 bars 1x
- Category: Snacks
- Method: Baking
- Cuisine: American
- Diet: Healthy
Ingredients
- 2 cups yogurt
- 1/2 cup honey
- 1/4 cup almond flour
- 1/2 teaspoon vanilla extract
- 1/4 teaspoon salt
- 1 cup mixed berries
Instructions
- Preheat your oven to 350°F (175°C).
- In a bowl, mix together yogurt, honey, almond flour, vanilla extract, and salt until combined.
- Fold in the mixed berries gently.
- Spread the mixture evenly into a greased baking dish.
- Bake for 25-30 minutes or until set and lightly golden on top.
- Allow to cool, cut into bars, and serve.
Notes
- These bars can be enjoyed warm or chilled.
- Substitute honey with maple syrup for a vegan option.
Nutrition
- Serving Size: 1 bar
- Calories: 150
- Sugar: 10g
- Sodium: 50mg
- Fat: 3g
- Saturated Fat: 1g
- Unsaturated Fat: 2g
- Trans Fat: 0g
- Carbohydrates: 25g
- Fiber: 2g
- Protein: 5g
- Cholesterol: 10mg
Keywords: Baked Yogurt Bars, Healthy Snacks, Easy Treats