
Introduction to Chocolate Thumbprint Cookies
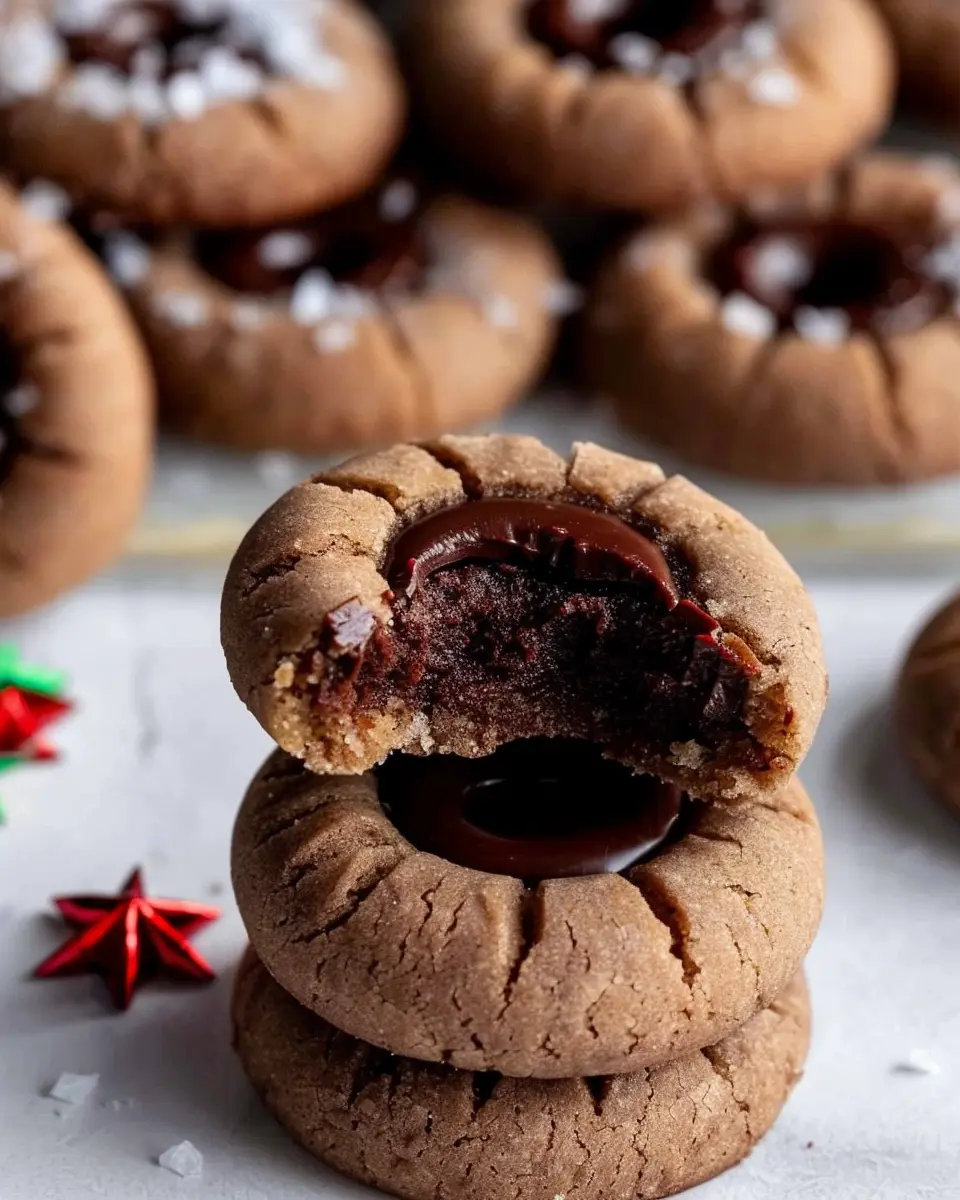
If you’re on the lookout for a delightful treat that combines indulgence with a touch of nostalgia, look no further than chocolate thumbprint cookies. These charming little confections not only please the eyes with their rustic appearance but also pack a punch with their rich flavors. Their versatility makes them an ideal snack for any occasion—be it an afternoon pick-me-up or a festive holiday gathering.
Why Chocolate Thumbprint Cookies Are a Must-Have Treat
So, what exactly makes chocolate thumbprint cookies stand out in the saturated realm of sweets? Firstly, let’s talk about their comforting texture. Biting into one reveals that perfect balance between a tender cookie and a luscious filling—usually chocolate but you can also get creative with various jams and spreads. Imagine the gooey chocolate center melting in your mouth as you savor the cookie’s crumbly edges. It’s pure bliss!
Another fantastic reason to whip up a batch is their simple preparation. Unlike some elaborate desserts that require special techniques or complicated ingredients, these cookies come together quickly. You’ll find that most of the ingredients are likely already in your pantry. Just a few essentials—like butter, sugar, and cocoa powder—and you’ve got the makings of a delectable dessert.
Beyond their taste and ease of making, chocolate thumbprint cookies also bring people together. There’s something inherently joyful about rolling dough into little balls and pressing your thumb into the center—a simple yet fun activity that invites creativity and conversation. Whether you’re cooking with friends or teaching your kids the magic of baking, these cookies are perfect for bonding over something delectable.
For tips and tricks on baking, there’s no shortage of resources to check out. Websites like EatingWell offer excellent advice on both baking techniques and ingredient swaps that can improve your cookie game. And if you’re curious about the origins of thumbprint cookies, you’ll find that their history is rich with tradition, making them even more special.
So, whether you’re a seasoned baker or a weekend warrior in the kitchen, chocolate thumbprint cookies are sure to become a beloved staple in your recipe collection. Ready to get started? Let’s dive into the recipe!

Ingredients for Chocolate Thumbprint Cookies
Creating delicious chocolate thumbprint cookies starts with gathering the right ingredients. Here’s what you’ll need to whip up a batch that will have everyone reaching for seconds!
Core Ingredients
- All-Purpose Flour: 2 cups helps give the cookies their structure.
- Cocoa Powder: ¾ cup adds that rich chocolate flavor we all love.
- Granulated Sugar: 1 cup ensures the perfect sweetness.
- Brown Sugar: ½ cup gives depth and moisture to the cookies.
- Butter: 1 cup (softened) for a creamy texture and rich taste.
- Egg: 1 large egg binds everything together.
- Vanilla Extract: 1 teaspoon enhances the chocolate experience.
Filling Delight
- Chocolate Chips: 1 cup for the filling; consider dark or semi-sweet depending on your preference.
- Optional Toppings: Sea salt, nuts, or sprinkles can lend a unique touch.
Make sure to have these goodies ready, and you’ll be on your way to making mouth-watering chocolate thumbprint cookies that impress! Happy baking! For further baking tips, check out resources like Serious Eats.
Preparing Chocolate Thumbprint Cookies
Creating the perfect chocolate thumbprint cookies is not just about combining ingredients; it’s about crafting a delightful experience that fills your kitchen with warm, inviting aromas and satisfies your sweet tooth. Let’s dive into each step of the process, ensuring that your baking adventure is as smooth as your dough.
Gather Your Ingredients
Before you start baking, it’s essential to have everything you need at hand. Here’s what you’ll require for these delectable cookies:
- 1 cup unsalted butter, softened
- 1 cup granulated sugar
- 1/2 cup packed brown sugar
- 2 large egg yolks
- 1 teaspoon vanilla extract
- 2 cups all-purpose flour
- 1/2 cup unsweetened cocoa powder
- 1 teaspoon baking powder
- 1/4 teaspoon salt
- 1 cup chocolate chips (for ganache)
Having your ingredients ready not only makes the process smoother but also allows you to unleash your creativity in a stress-free environment.
Prepare the Dry Ingredients
In a separate bowl, whisk together your dry ingredients. This includes the flour, cocoa powder, baking powder, and salt. An essential tip here is to sift the cocoa powder to avoid lumps, ensuring a smooth texture. This simple step is crucial for the final taste, as uneven distribution can lead to an unexpected bitter bite. To dive deeper into the benefits of sifting, check out this baking guide.
Cream the Butter and Sugars
In a mixing bowl, combine the softened butter, granulated sugar, and brown sugar. Using a hand mixer or stand mixer, cream the mixture until it’s light and fluffy. This step usually takes about 3-5 minutes. Allowing air to incorporate here not only improves the texture but contributes to the overall structure of your chocolate thumbprint cookies.
Mix in the Egg Yolks and Vanilla
Next, drop in those two egg yolks and the vanilla extract. Beat them into the mixture until everything is combined. The yolks will enrich the dough, adding moisture and a lovely golden hue. Imagine that fragrant scent of vanilla enveloping your space—it’s like a warm hug for your senses!
Combine the Dry Ingredients with the Wet Ingredients
Gradually add your dry mixture to the wet mixture. It’s best to do this in parts to avoid any splatter. Mix until fully integrated, but don’t overdo it; a few flour streaks left is completely acceptable. At this stage, you want a soft dough that’s not too sticky, making it easy to shape into balls.
Shape the Dough into Balls
Now comes the fun part! Take small portions of your dough and roll them into balls, about the size of a tablespoon. This is where the texture of your cookie really starts to take shape. If they’re slightly uneven, don’t worry—each cookie will have its own charm.
Create Indents and Chill the Dough
Place your dough balls onto a baking sheet lined with parchment paper. Use your thumb to create an indent in the center of each ball; that’s where your ganache will eventually go! Once all the dough is indented, refrigerate them for at least 30 minutes. Chilling firms up the dough, making your cookies easier to handle and less likely to spread while baking.
Bake the Cookies
Preheat your oven to 350°F (175°C). Bake your cookies for about 10-12 minutes. You want them to be set at the edges but still soft in the center. Keep an eye on them—nothing is worse than burnt cookies, and that bittersweet taste is no friend to your chocolate thumbprint cookies!
Prepare the Chocolate Ganache
While the cookies are baking, prepare your chocolate ganache. In a microwave-safe bowl, heat the chocolate chips until melted, stirring until smooth. Ganache is a beautiful blend of cream and chocolate that’s glossy and divine. You can add a splash of heavy cream if you prefer a creamier consistency.
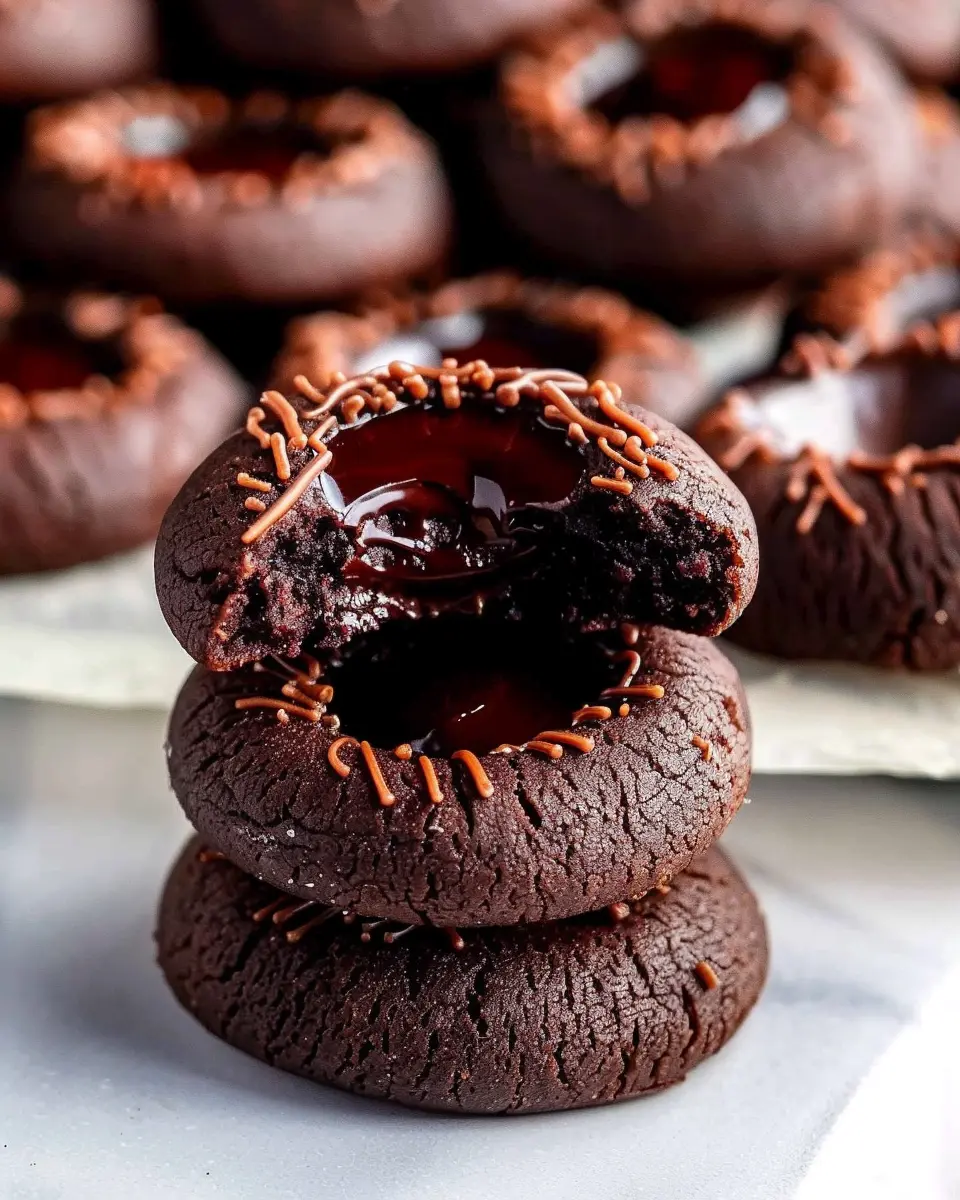
Assemble the Cookies
Once your cookies have cooled, fill the indented centers with the velvety ganache. Let them sit for a few minutes to set. The shiny chocolate filling coupled with the soft cookie creates an irresistible combination that’s perfect for any occasion.
With all these steps, your chocolate thumbprint cookies will undoubtedly be a showstopper! So gather your ingredients and get baking—your taste buds will thank you! If you enjoyed this guide, feel free to check out other delicious cookie recipes to perfect for your next gathering or a cozy night in.
Variations on Chocolate Thumbprint Cookies
Nutty Chocolate Thumbprint Cookies
If you’re a fan of chocolate thumbprint cookies, you’ll love adding a nutty twist to the classic recipe. Simply incorporate ground nuts like almonds, hazelnuts, or pecans into your dough for a delightful crunch. This not only enhances the flavor but also provides a charming texture that pairs beautifully with chocolate. You can even press a whole nut into the center of each cookie before baking, adding an eye-catching touch and an extra burst of flavor.
Feeling adventurous? Try using nut-based flours, such as almond flour, instead of regular flour to create gluten-free cookies that are just as delicious. You might want to balance the sweetness by using dark chocolate, as it complements the nuttiness perfectly. For inspiration, check out this wonderful almond flour recipe that can be a great base for your thumbprints.
Seasonal Flavors for Your Thumbprints
One of the exciting aspects of chocolate thumbprint cookies is how easily you can adapt them to seasonal flavors. Picture the warm spices of fall: try adding cinnamon or pumpkin spice to your dough during autumn, or opt for peppermint extract during winter holidays to give your cookies a refreshing flair.
When summer rolls around, consider stuffing your thumbprints with homemade berry preserves like raspberry or strawberry. This not only enhances the visual appeal but also introduces a tangy contrast to the rich chocolate. Want to learn more about unique flavor combinations? Explore seasonal produce guides on websites like the USDA’s Seasonal Produce page for some creative inspiration!
These variations ensure that your chocolate thumbprint cookies remain a beloved treat year-round, keeping your friends and family coming back for more. So why settle for ordinary when your cookies can be extraordinary?
Baking Tips for Chocolate Thumbprint Cookies
Baking chocolate thumbprint cookies can be a delightful experience, especially when you know a few key tips to ensure success. Here’s how to create those perfect, melt-in-your-mouth treats!
Choose the Right Chocolate
Using high-quality chocolate is crucial. Opt for semi-sweet or dark chocolate—these options provide rich flavor and great texture. Brands like Ghirardelli or Guittard are excellent choices for baking source.
The Importance of Temperature
Always start with your butter at room temperature. This allows for a creamy dough, facilitating better incorporation of the ingredients. If you forgot to take it out early, you can soften it in the microwave for a few seconds, but be careful not to melt it!
Don’t Overmix
When combining ingredients for your chocolate thumbprint cookies, mix just until everything is combined. Overmixing can lead to tougher cookies due to gluten development. The less you mix, the more tender your cookies will be!
Test for Doneness
As cookies bake, they may appear soft in the center. Remember, they will continue to firm up on the baking sheet. Ideally, remove them when the edges are set but the centers look slightly underbaked for that perfect chewy texture.
With these tips, your chocolate thumbprint cookies should turn out delectable every time! Happy baking!
Serving Suggestions for Chocolate Thumbprint Cookies
When it comes to enjoying chocolate thumbprint cookies, the possibilities are endless! These delightful treats are not just a dessert; they can be part of a lovely experience. Here are some creative serving suggestions that will elevate your cookie game.
Pairing with Milk Alternatives
Cross over into cookie utopia by pairing your chocolate thumbprint cookies with a glass of cold almond or oat milk. These options compliment the rich chocolate flavors beautifully and provide a creamy balance that’s heavenly! For a fun twist, try serving them alongside a warm cup of spiced chai or a robust cup of coffee.
Presentation Matters
Consider arranging your cookies on a stylish platter, sprinkled with a dusting of powdered sugar. This simple garnish adds sophistication and enhances the cookie’s visual appeal, making them perfect for gatherings or a cozy movie night.
Creative Toppings
Step up your decorating skills by experimenting with different fillings in the thumbprints. Whether you choose raspberry jam, caramel, or even a zesty lemon curd, the flavor combinations can take your chocolate thumbprint cookies to the next level.
Want to delve even deeper into cookie artistry? For more ideas on enhancing your desserts, check out resources like The Cookie School or Serious Eats. Remember, the secret to being a great host is not only in what you serve, but how you present it!
Time Breakdown for Chocolate Thumbprint Cookies
Preparation Time
Making chocolate thumbprint cookies is a delightful experience that begins with about 15-20 minutes of preparation. This is when you’ll gather your ingredients, mix them together, and roll those beautiful cookie balls. Trust me, the sneaky spoonfuls of dough are all part of the fun!
Baking Time
Next, it’s time for the magic to happen in the oven. Bake your cookies for 12-15 minutes, allowing them to achieve that perfect balance of chewy and crunchy. The aroma wafting through your kitchen during this time is simply irresistible.
Total Time
In total, you’re looking at approximately 30-40 minutes from start to finish. Perfect for a cozy day at home or impressing guests at your next gathering. Why not whip up a batch and share them with friends? For more tips on cookie baking, check out Taste of Home for extra inspiration!
Nutritional Facts for Chocolate Thumbprint Cookies
Indulging in chocolate thumbprint cookies can be a delightful experience! Here’s a quick look at their nutritional profile to help you enjoy these treats mindfully.
Calories
One cookie typically contains around 120 calories. It’s essential to remember that moderation is key when satisfying that sweet tooth!
Sugar
Each cookie is also packed with approximately 10 grams of sugar. For a more balanced treat, consider reducing the sugar in your recipe or pairing these cookies with a cup of herbal tea to mitigate the sweetness.
Carbs
When it comes to carbohydrates, expect about 15 grams per cookie. These carbs can provide a quick energy boost, perfect for a mid-afternoon snack or a dessert after dinner.
Enjoy your baking and remember, balance is essential! For more information about the health benefits of chocolate, check out Healthline to dive deeper into this delicious world.
FAQs About Chocolate Thumbprint Cookies
Can I make these cookies ahead of time?
Absolutely! Chocolate thumbprint cookies are perfect for batch baking. You can prepare the cookie dough a day or two in advance. Just wrap it tightly in plastic wrap and store it in the refrigerator until you’re ready to bake. If you’re planning to make a larger batch, you can even freeze the cookie dough for up to three months. When you’re ready to bake, simply let the dough thaw in the fridge overnight. It’s an excellent way to keep your baking schedule flexible.
What can I use if I don’t have chocolate chips?
No chocolate chips? No problem! You can substitute them with a variety of delicious alternatives. Consider using:
- Chopped chocolate bars or a chocolate bar of your choice
- Caramel or butterscotch chips for a sweet twist
- Nut butters like almond or peanut for a unique flavor profile
Each option will create a tasty variation on your chocolate thumbprint cookies, so feel free to get creative.
How do I store leftover cookies?
Storing your cookies properly will ensure they stay fresh and delicious. Here’s how:
- Room Temperature: Place the cookies in an airtight container, separated by parchment paper for easy access. They should be good for about a week.
- Refrigerator: If you live in a warmer climate, storing your cookies in the fridge can help maintain their freshness. Just be sure they’re in a sealed container to avoid absorbing other odors.
- Freezer: For longer storage, freeze your cookies! Just layer them in an airtight container with parchment paper between the layers and freeze for up to three months. Thaw them at room temperature when you’re ready to enjoy!
Keeping your chocolate thumbprint cookies fresh and ready for snacking is just that simple! For more tips, you can check out resources like King Arthur Baking or Food Network.
Conclusion on Chocolate Thumbprint Cookies
When it comes to delightful treats, chocolate thumbprint cookies truly stand out. They’re easy to make, perfect for sharing, and just the right blend of chocolatey goodness and sweet jam. Baking these cookies allows you to unleash your creativity, whether you choose classic raspberry jam or experiment with something unique like spicy mango chutney.
As you whip up your chocolate thumbprint cookies, remember to savor the moments—baking is as much about making memories as it is about enjoying delicious food. Whether for a cozy get-together or a casual treat for yourself, these cookies are sure to impress. Happy baking!
For more insights on cookie recipes, check out this article on the science of baking cookies. You’ll find tips and tricks that could elevate your baking game even further!
PrintChocolate Thumbprint Cookies: The Best Indulgent Treat to Bake at Home

Indulge in the rich, chocolaty goodness of these delightful cookies, perfect for any occasion.
- Prep Time: 20 minutes
- Cook Time: 15 minutes
- Total Time: 35 minutes
- Yield: 24 cookies 1x
- Category: Dessert
- Method: Baking
- Cuisine: American
- Diet: Vegetarian
Ingredients
- 1 cup unsalted butter, softened
- 1 cup granulated sugar
- 2 cups all-purpose flour
- 1/2 cup unsweetened cocoa powder
- 1 teaspoon vanilla extract
- 1/4 teaspoon salt
- 1/2 cup chocolate chips for filling
Instructions
- Preheat the oven to 350°F (175°C).
- In a large bowl, cream together the butter and sugar until smooth.
- Mix in the flour, cocoa powder, vanilla, and salt until well combined.
- Shape the dough into small balls and place them on a baking sheet.
- Make a small indentation in the center of each ball.
- Fill each indentation with a small amount of chocolate chips.
- Bake for 12-15 minutes, then allow to cool on a wire rack.
Notes
- For a more intense chocolate flavor, use dark cocoa powder.
- These cookies can be decorated with sprinkles for an extra touch.
Nutrition
- Serving Size: 1 cookie
- Calories: 120
- Sugar: 10g
- Sodium: 75mg
- Fat: 8g
- Saturated Fat: 5g
- Unsaturated Fat: 2g
- Trans Fat: 0g
- Carbohydrates: 12g
- Fiber: 1g
- Protein: 2g
- Cholesterol: 30mg
Keywords: Chocolate Thumbprint Cookies